How to Apply Advanced Conditional Branching to Your Survey in ProProfs Survey Maker
Conditional Branching is a feature that allows you to customize your surveys based on your participants' responses. With Conditional Branching, you can show or hide questions, jump to different pages, end the survey early, or redirect users to a URL, depending on the answers.
Industrial Use-Case
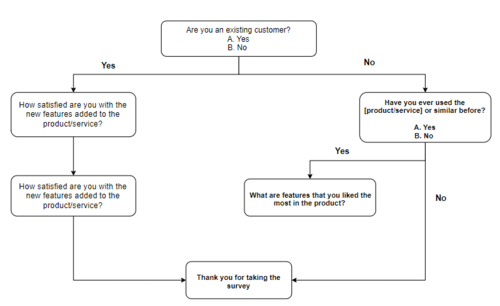
Suppose you are a marketing manager who wants to conduct a customer satisfaction survey for your new product launch. You want to ask different questions to customers who have purchased the product and those who have not. You also want to follow up with customers who are dissatisfied with the product and offer them a coupon code.
Benefits of applying Conditional Branching:
- Increase response rates: Conditional Branching helps you keep your surveys relevant and engaging for your participants, which can improve their completion rates.
- Get better insights: Conditional Branching helps you collect more accurate and specific data from your participants, which can help you make informed decisions.
- Save time and resources: Conditional Branching helps you avoid asking unnecessary or redundant questions, saving time and resources in creating and analyzing your surveys.
This article covers the following:
1. Using Conditional Branching
2. Adding Rule
Using Conditional Branching
To add conditional branching to your survey,
1. In the survey editor, navigate to the question/page where you want to add logic.
2. Click Advanced > Conditional Branching. A slider window will open.

3. Define a rule by adding a condition. You can add multiple conditions under one rule. You can add multiple rules as well.

4. Set up any follow-up events when the rules are met through the respondent’s answers.
Then, Go to {Select Question}
OR
Then, Redirect to {Add a URL}
OR
Then, Hide {Select Question}

Now, whenever the conditions defined in the rule are met, the Conditional Branching will work accordingly.
Adding Rule:
You can set a single rule for a question using a combination of conditions having “Is equals to” and “Is not equals to” operators. Or apply multiple rules to the question based on your requirements.
When defining a rule, the question on which you enable Conditional Branching will have its preceding questions in the list. This allows you to control the progression of the survey based on the user’s responses.
For example, suppose you have a survey for an e-commerce website where you want to display specific questions to respondents who select “Male” as their gender in Q1 and are over 18 based on their responses in Q2.
To use both conditions in one rule, you can apply the rule to Q2, as shown below.
-
Select the question to edit and turn on Conditional Branching under Advanced.

-
In the slider, do the following after clicking “Add Rule”:
1. Select the conjunction.
- All-Conditions Rule– Requires all of the listed conditions to be met.
- Any-Conditions Rule– Requires any of the listed conditions to be met.
2. Select the question, choose the operator, and pick the answer option.
3. To add multiple conditions, click Add New Condition. Repeat the process.
Remember, you cannot have the same operator for multiple conditions under a single rule.
4. Select the action event and the question.
Once done, click Save.

Likewise, you can add another rule to further fine-tune the survey progress for survey takers. Click Add Rule to proceed.

Managing Rule:
You can quickly modify or remove rulesets in Survey Maker. Click the Edit or Delete icon to initiate an action.

And that's it! If you encounter any issues or have any questions, don't hesitate to reach out to our support team.